


The Homestead Pantry Box X Company on Sundays Mother's Day collab
Featuring a scrummy Mother's Day feast for next weekend.
There’s exactly one week until Mother’s Day.
We’ve teamed up with the lovely Sal from The Homestead Pantry Box to bring you a feast fit for a full table, a bottle of bubbles or two and some wholesome family time.
Five-hour Preserved Lemon Harissa Lamb
Hassle Back Butternut Squash
Braised Leeks and Peas with Feta and Dill
Duck Fat Roasted Smash Potatoes
Chocolate Hazelnut Tart
Dear reader, I know I don’t need to remind you but if your partners, spouse, daughter, son-in-law, grandchildren need a gentle reminder then this is for them. Forward them this newsie complete with produce list and step by step instruction, either subtly or not-so-subtly, and clear your calendar for lunch next Sunday. Because there’s no better feeling than having all the people you love sitting around the same table.
As Sal would say, sweet as honey.
Thea x
Five-hour Preserved Lemon Harissa Lamb
A leg of lamb slow-cooked until the meat is fall-apart tender and flavoured to perfection! Roasting this lamb low & slow is an easy, stress-free way of perfecting your roasting skills. No carving required!
Serves: 6-8 || Effort: Easy || Prep: 15 mins + overnight marinating || Cook: 5 hours
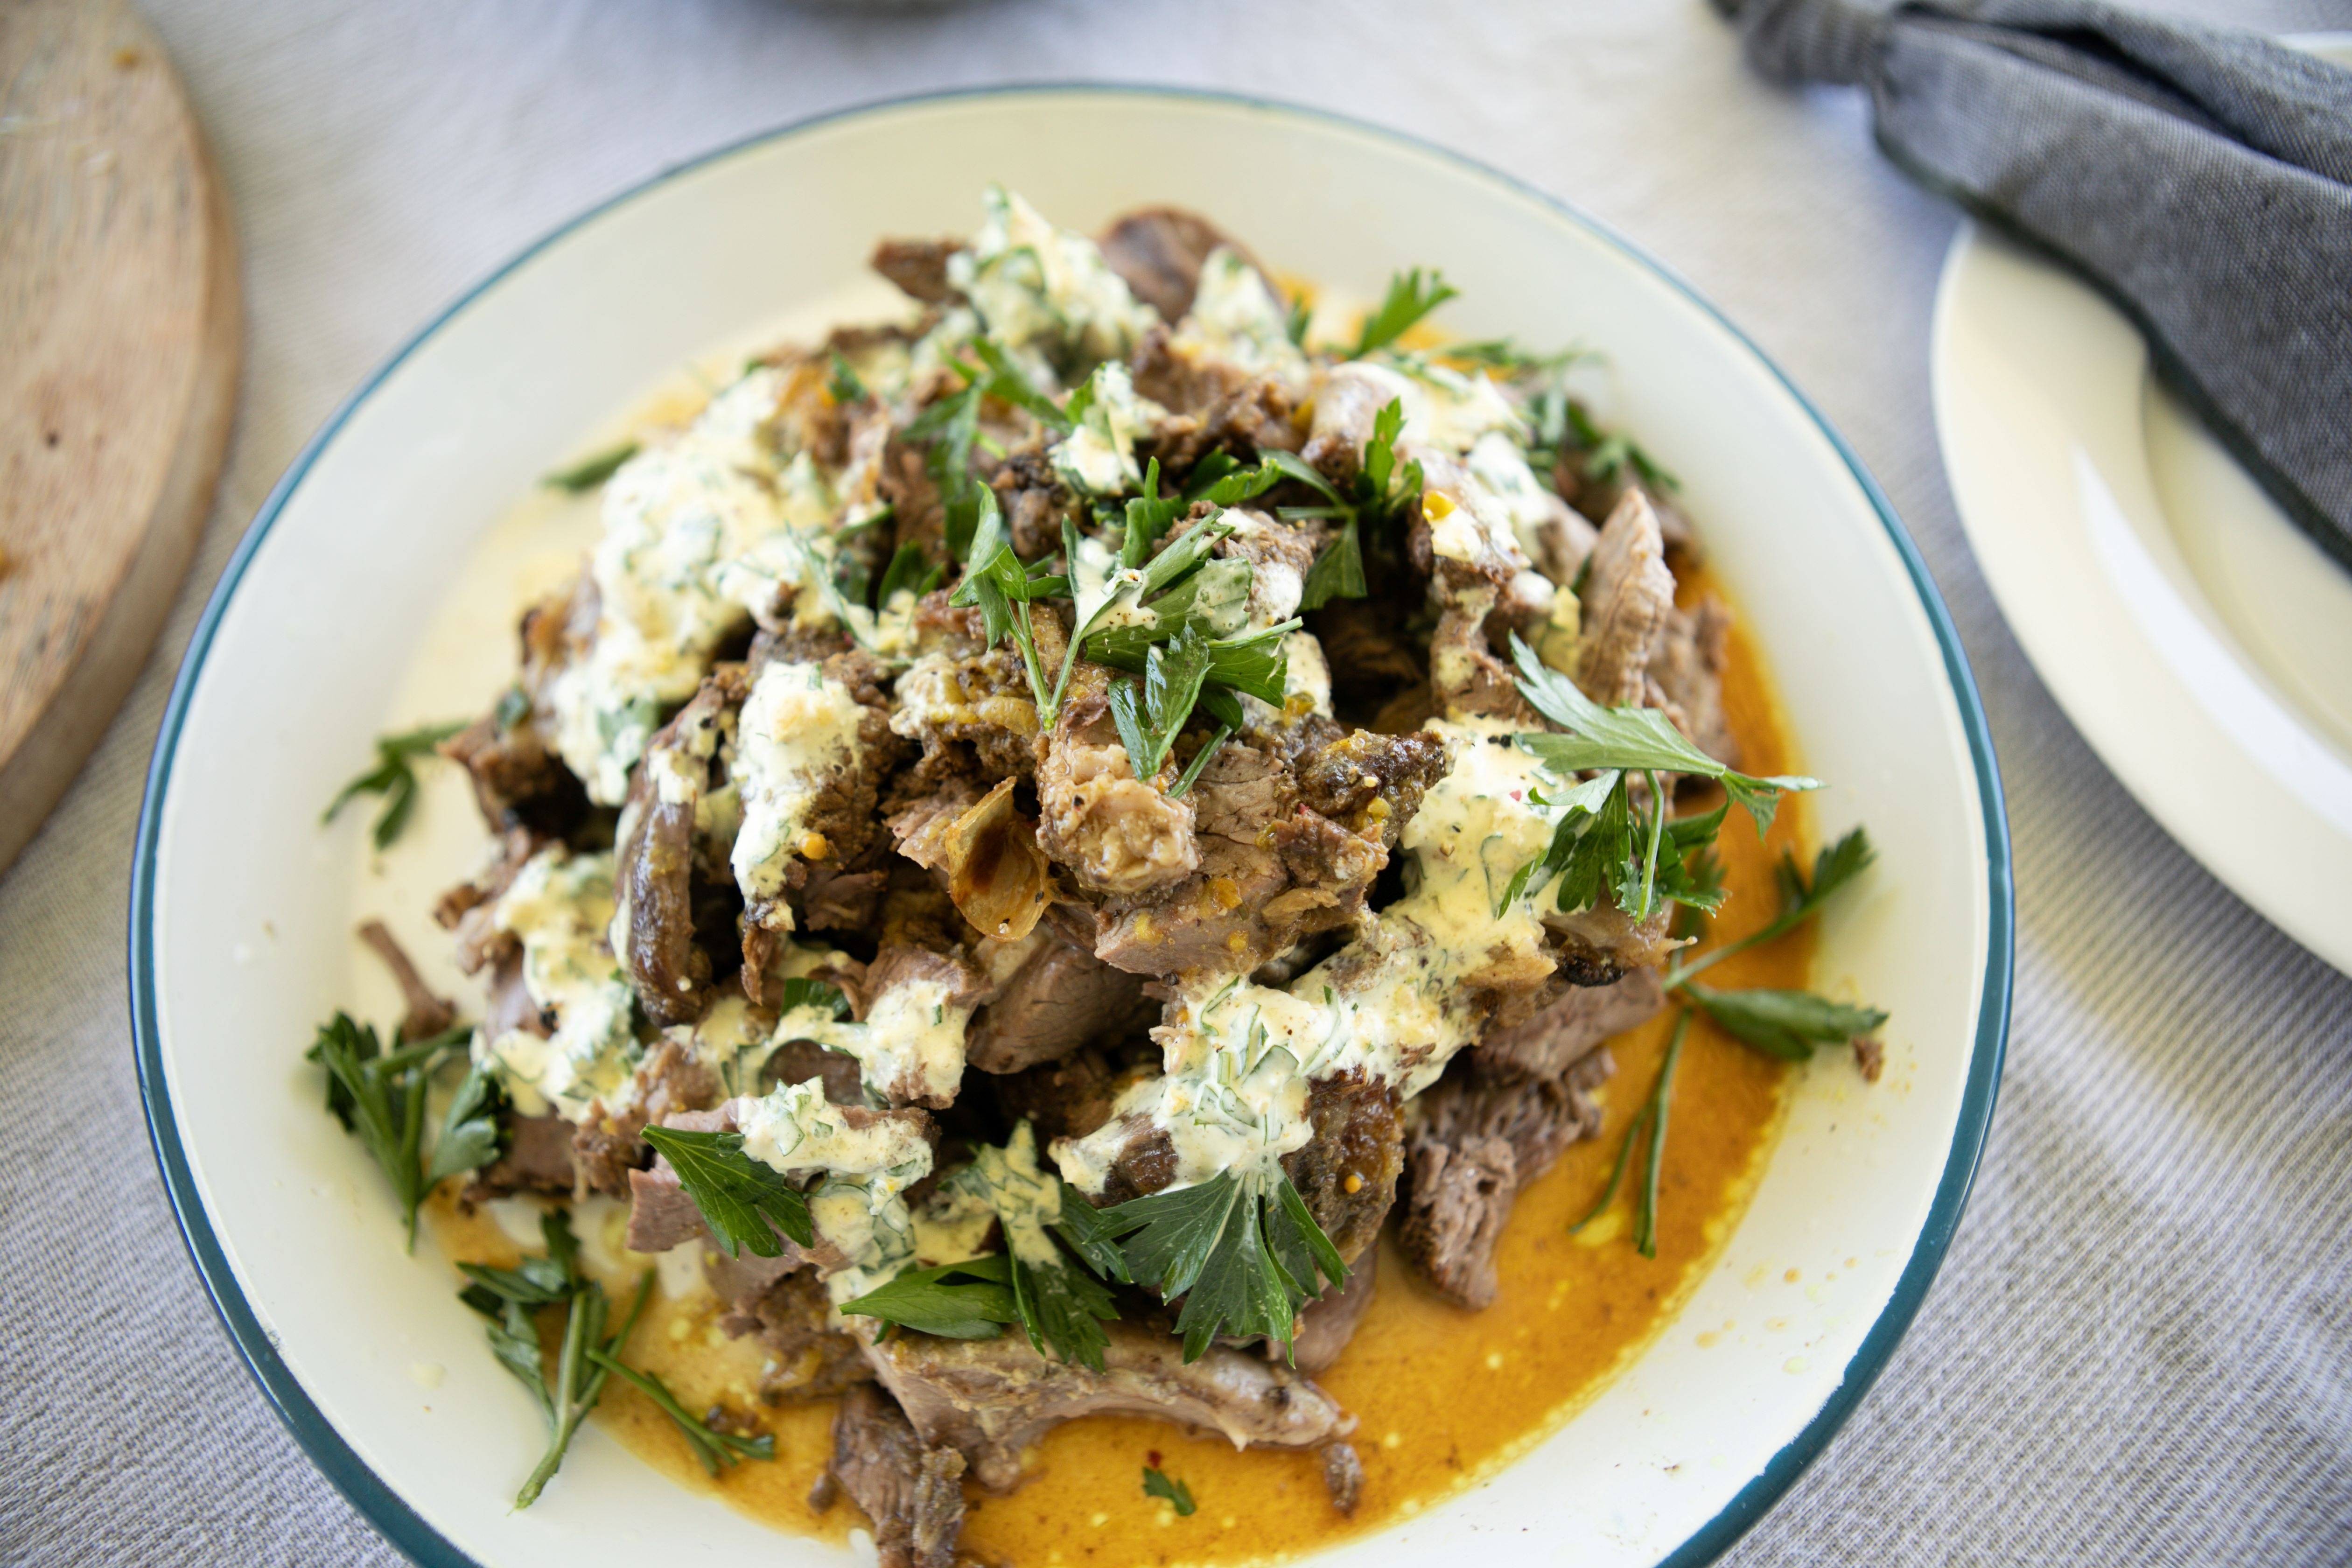
Ingredients
2-3 kg Leg of Lamb
1 jar of Josh & Sue Preserved Lemon Harissa
1 whole Garlic Bulb + 1 Clove
Salt & Pepper
170g tub of natural yoghurt
Fresh parsley & dill - optional
Instructions
Marinate the night before: marinate the lamb with the entire jar of Josh & Sue preserved lemon harissa, reserving 1/4 of the jar for later use.
Next Day:
Preheat the oven to 160°C fan / 180°C / 350°F / Gas Mark 4.
Cut the garlic bulb in half widthways and place it in an oven dish. Set the lamb on top and season generously with salt and pepper.
Cover the lamb with foil and roast for 4.5 hours.
Remove the foil for the last 30 minutes to allow the lamb to brown, basting it with juices every 10 minutes.
Yoghurt Sauce: Mix the reserved 1/4 jar of harissa with the finely chopped garlic clove and natural yoghurt.
Serving: Serve the lamb with the delicious juices drizzled over the top. Accompany with the yoghurt sauce and fresh herbs if using.
Hints & Tips - To check if the meat is tender, it should offer no resistance to your knife. If not, return the covered lamb to the oven and check again after 45 minutes.
Hassle Back Butternut Squash
Enjoy this Hassel Back Butternut Squash recipe, prepared with a garlic-lemon infused butter seasoning, accompanied with a tangy yogurt sauce, toasted pine nuts, and fresh basil for a delicious and nutritious side dish that will pair with any roast meat.
Serves 4 || Effort: Easy || Prep time: 15 mins || Cook time: 40 mins || Gluten free
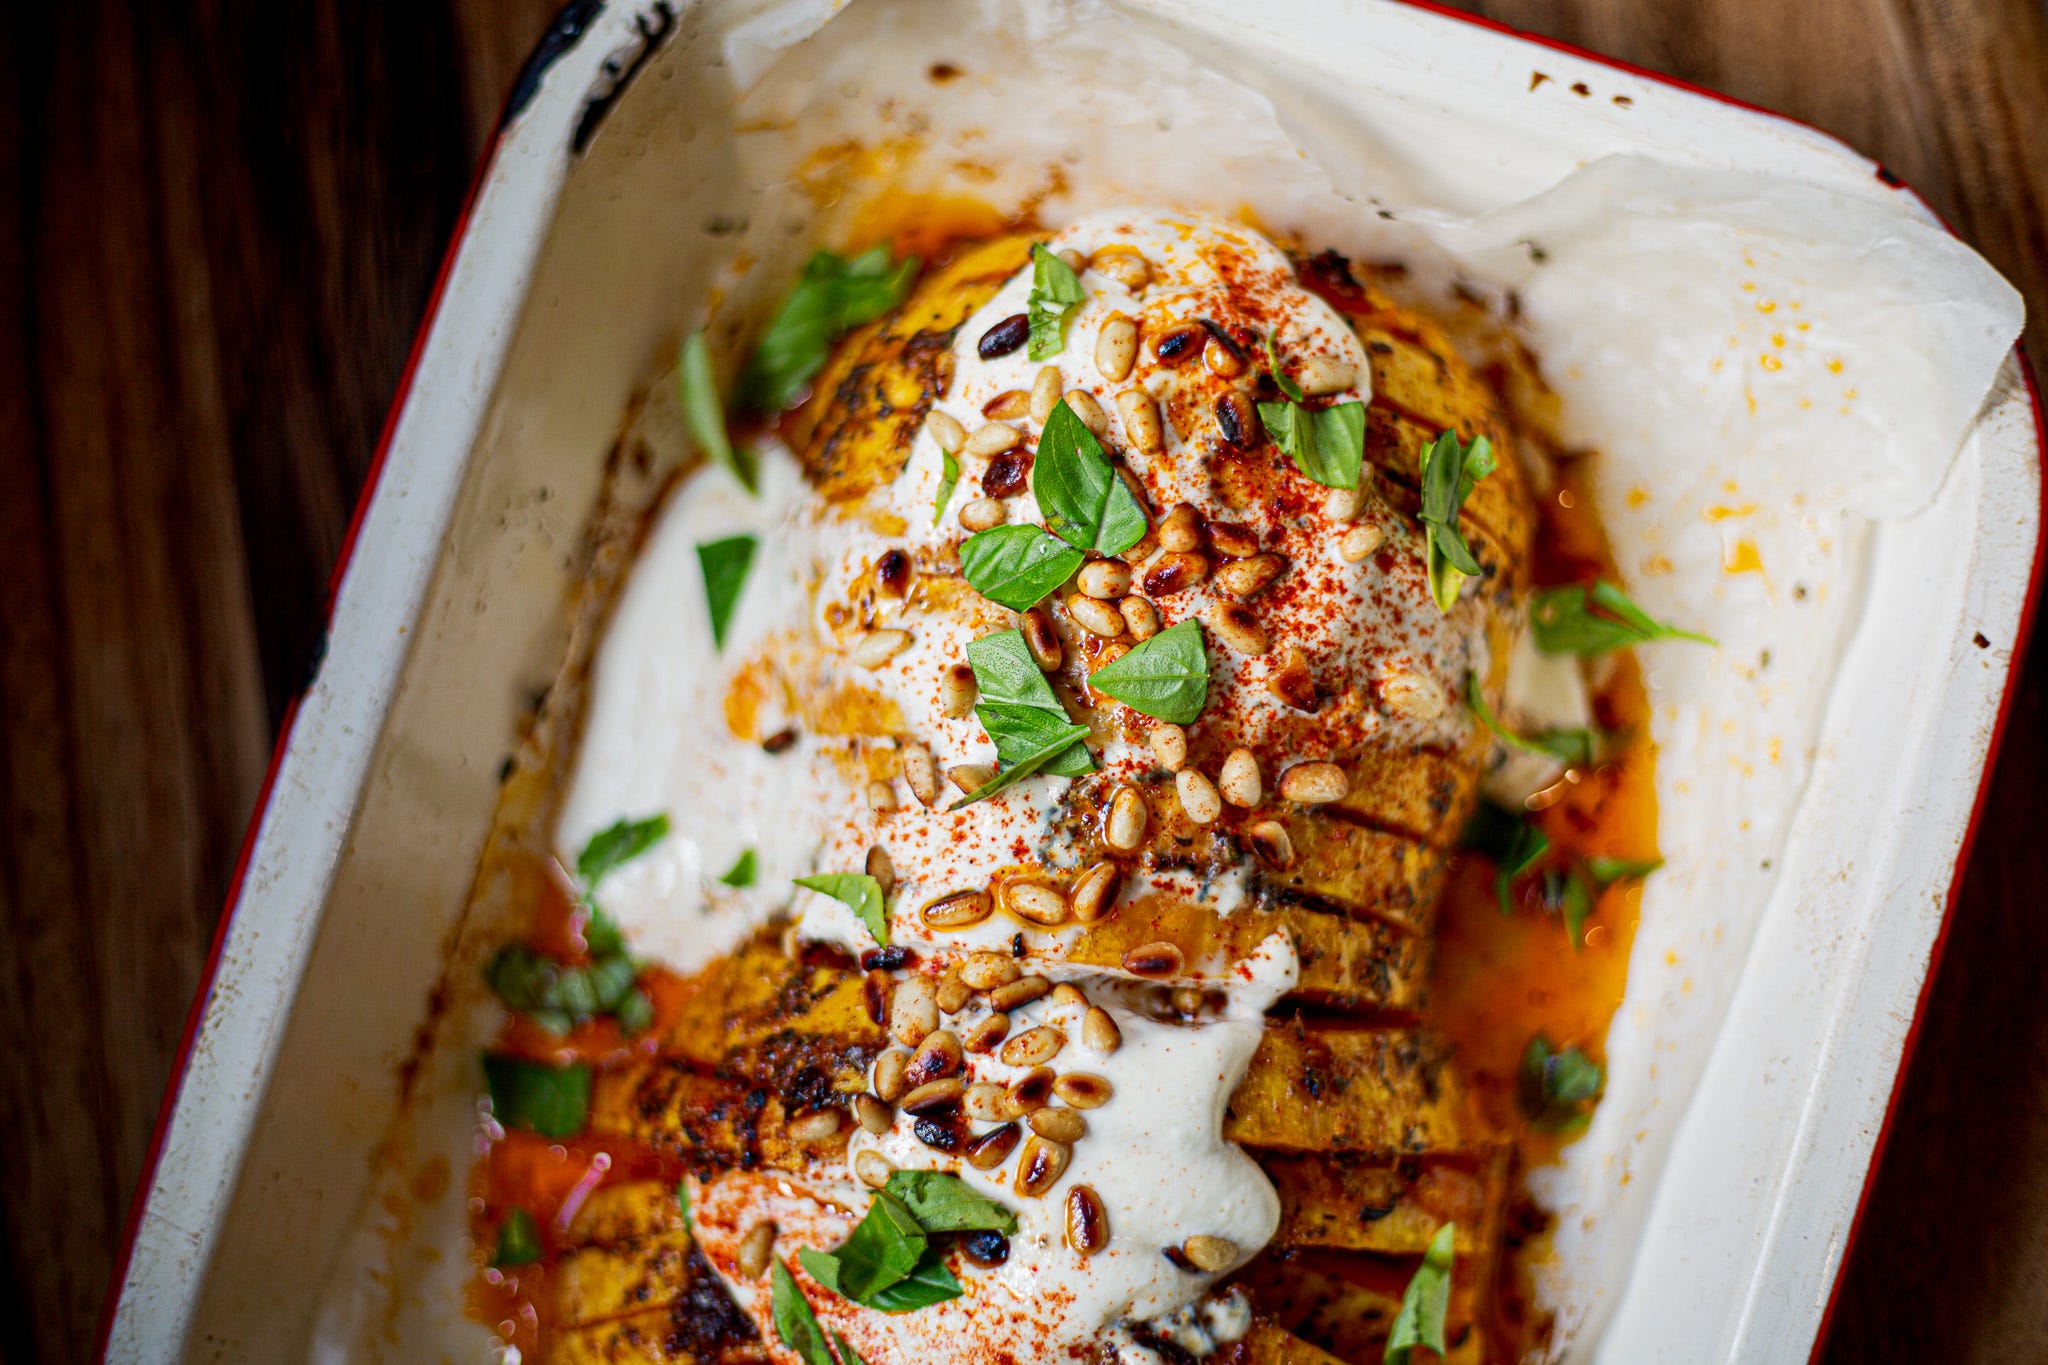
Ingredients
1/2 butternut squash
1 tbsp olive oil
3 tbsp butter
1/2 tsp paprika
1 tsp Thai Basil Seasoning
10 basil leaves, chopped
Salt, to taste
Pepper, to taste
To serve
2 tbsp toasted pine nuts
1/2 cup natural yogurt
Juice of half a lemon
1/2 tsp garlic powder
Instructions
Preheat the oven to 220C/ 200C fan.
Peel the butternut squash and remove the seeds.
Hasselback the butternut squash by making thin, even slices, stopping before cutting all the way through. You can achieve this by placing two wooden spoons or chopsticks on either side of the squash to guide your knife. Go slowly to ensure precision.
Soften 3 tbsp of butter in the microwave, then mix in the paprika and Thai Basil seasoning until well combined.
Place the butternut squash in a baking dish and baste thoroughly with the butter mixture. Roast in the oven for 20 minutes.
After 20 minutes, remove from the oven and baste again with the remaining butter mixture. Return to the oven and bake for another 20 minutes or until cooked through. Test with a sharp knife to check for tenderness.
While the squash is cooking, prepare the yogurt sauce by mixing together the natural yogurt, lemon juice, and garlic powder. Set aside until ready to serve.
Toast the pine nuts in a dry frying pan or air fryer, then set aside for serving.
Once the squash is done, remove it from the baking dish and baste once more with any remaining melted butter. Season with salt and pepper.
Dollop the prepared yogurt sauce over the squash, then sprinkle with toasted pine nuts and chopped basil leaves.
Hints & Tips
Hassel backing is a technique for creating thin, even slices in potatoes or other items, allowing for additional flavourings and textures. This involves slicing the item thinly but not all the way through, creating a fan-like appearance.
Use two wooden spoons or chopsticks to guide your knife when making Hasselback cuts, ensuring you don't slice all the way through.
Optionally, roast the squash for 15 minutes before slicing to soften it and make the cutting process easier. This helps in achieving more precise cuts.
Experiment with different types of paprika for varied flavor profiles. Options include sweet, Hungarian, smoked, or hot paprika.
Fresh garlic can be substituted for garlic powder in the yogurt sauce, adjusting to taste. Keep in mind that fresh garlic will have a more pronounced flavor.
Serve this dish as a side to roasted meats for a flavourful addition to your meal. It pairs well with dishes like roast chicken or lamb.
Store leftovers in the fridge for 3-4 days in an airtight container. Reheat before serving if desired.
Braised Leeks and Peas with Feta and Dill
A delicious side dish of leeks braised in chicken stock with peas, lemon, feta and dill.
Serves 4 || Effort: Easy || Prep time: 10 minutes || Cook time: 20 minutes || Gluten free
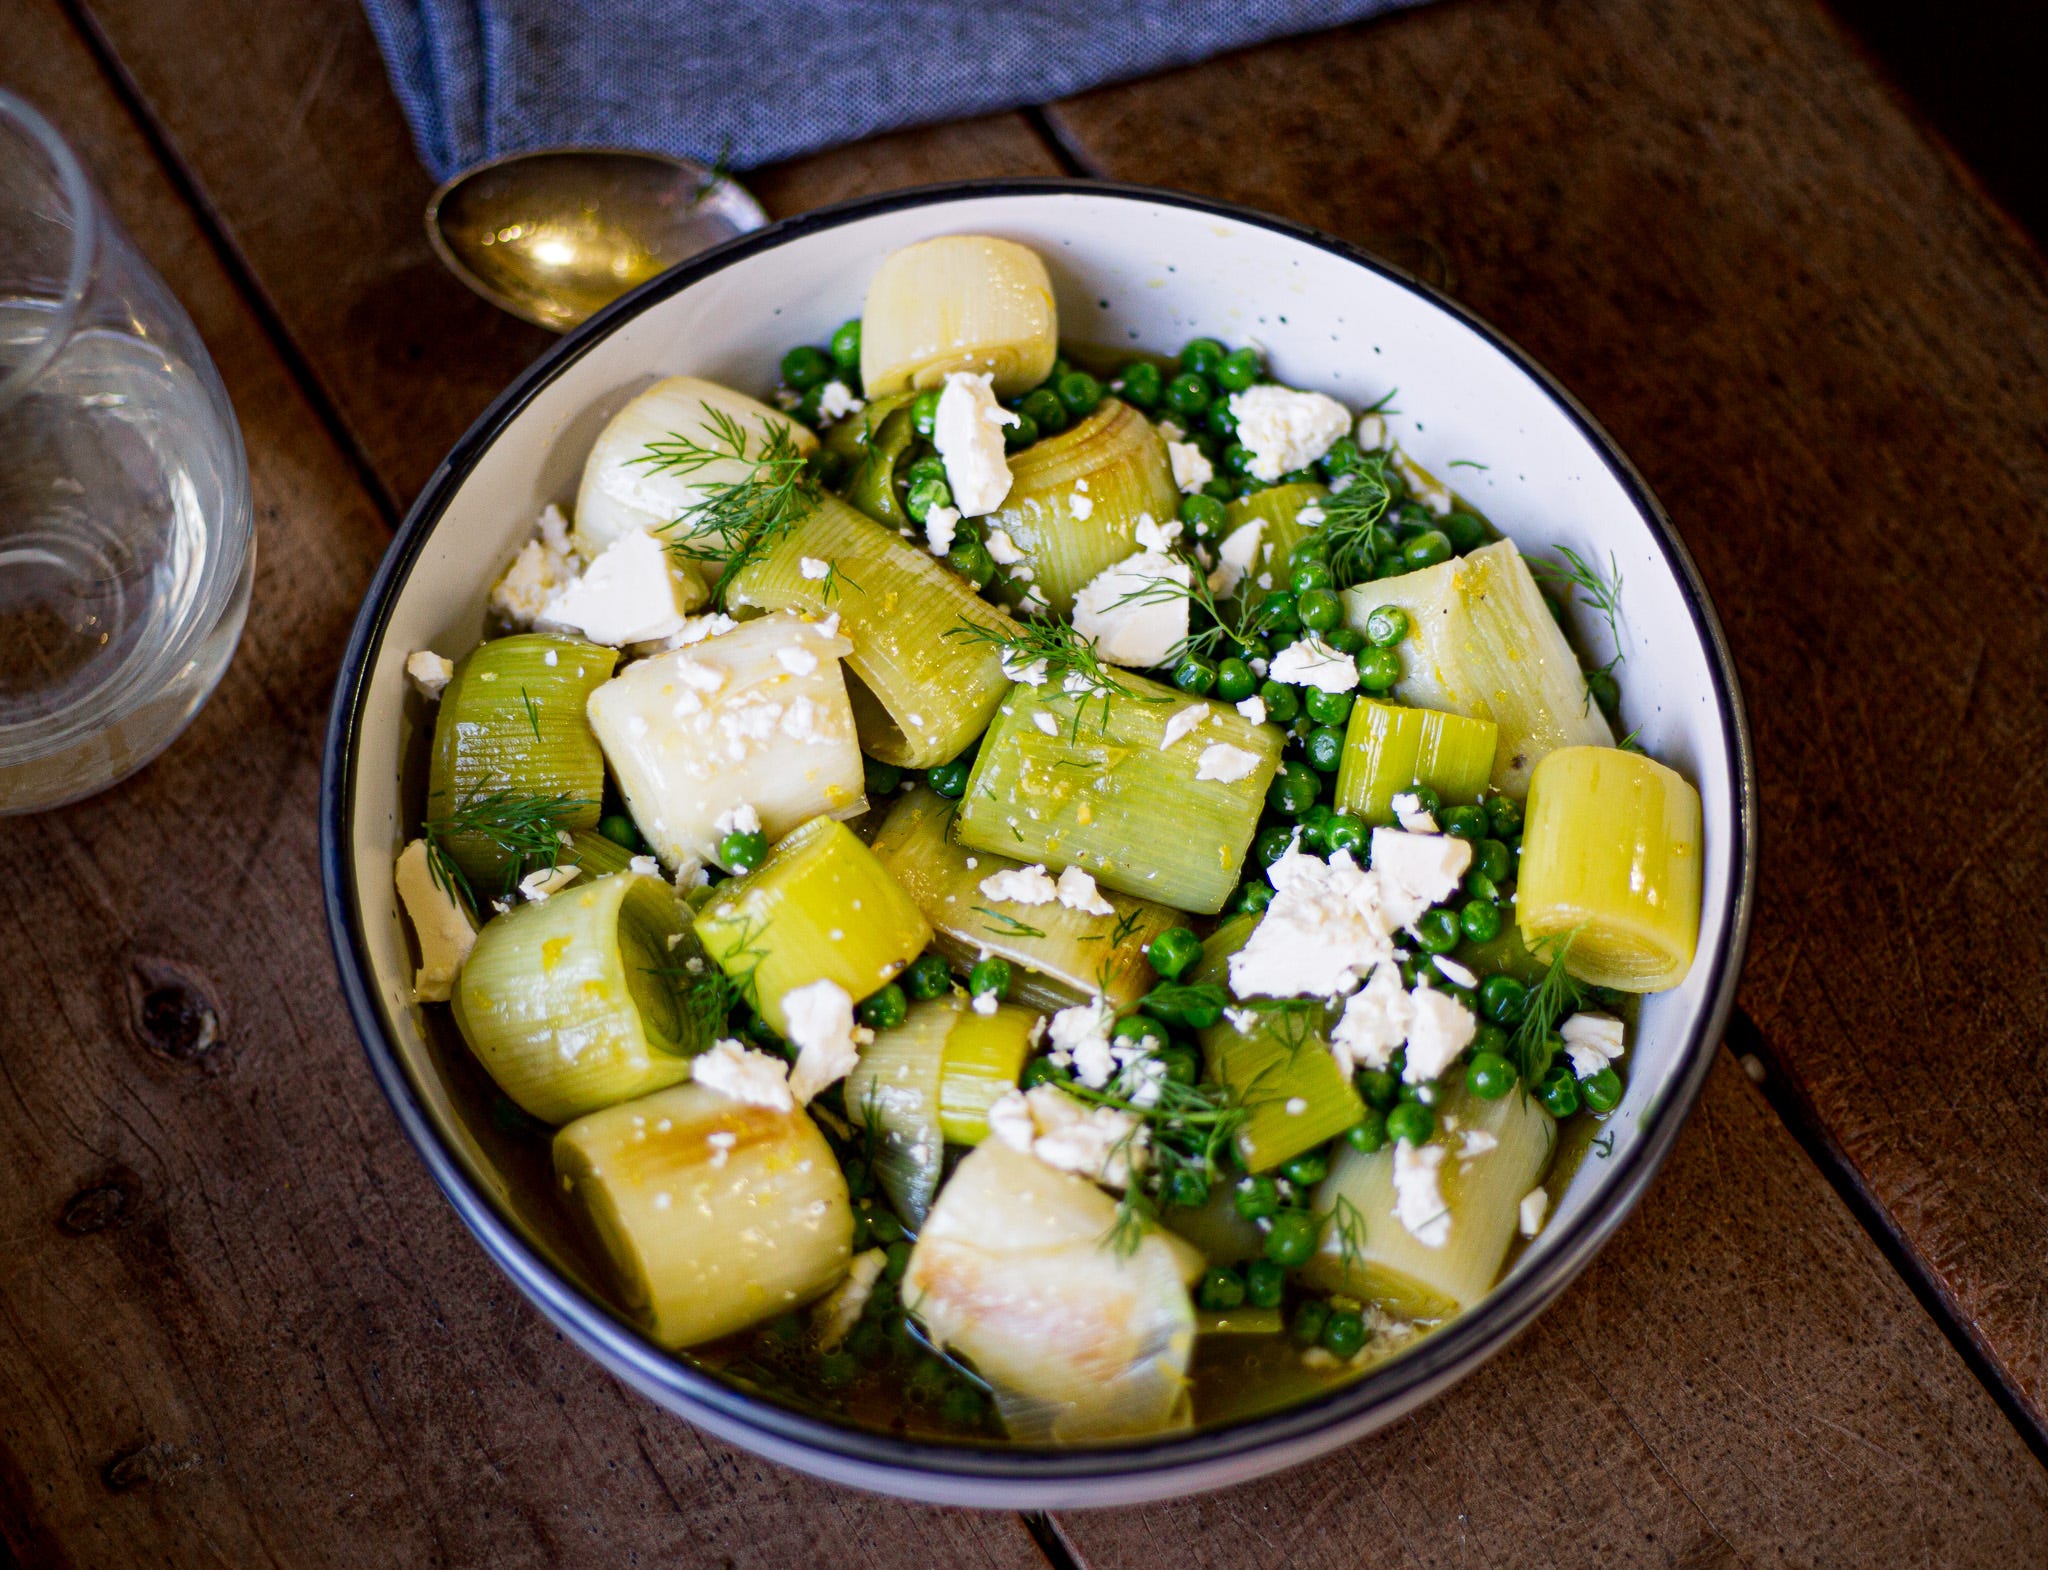
Ingredients
2-3 large leeks
1/4 cup extra virgin olive oil
1/3 cup chicken stock - like this one from San Elk
1 cup frozen peas
zest from one lemon
150g crumbled feta cheese
Fresh dill fronds
Salt & pepper
Instructions
Remove the dark green tops from the leeks and discard and rinse the leeks very well in cold running water. If the leeks are especially dirty, you may need to cut slit on the outer edge to rinse them very well.
Once clean, cut the leeks into 1 inch pieces.
Heat the olive oil over low heat in a large frying pan. Add the leeks and saute until they are beginning to get tender, about 5-6 minutes. Stir leeks frequently and try not to let them brown.
Add the chicken stock, season with salt and pepper, and bring the leeks to a gentle simmer.
Cover with a lid and cook until leeks are tender when poked with a knife, about 10 minutes. (Stir the leeks occasionally while they are cooking to make sure they don’t burn).
Remove the lid and add the frozen peas, lemon zest to the pan.
Cook for 2-3 minutes longer, until the peas are just tender.
Transfer to a bowl and sprinkle with the feta cheese and dill fronds. Serve warm.
Duck Fat Roasted Smash Potatoes
Enjoy crispy perfection with these Duck Fat Roasted Smashed Potatoes, baked until golden, crunchy.
Serves 4 || Effort: Easy/ Moderate || Preparation time: 15 minutes || Cooking time: 50 minutes || Gluten free
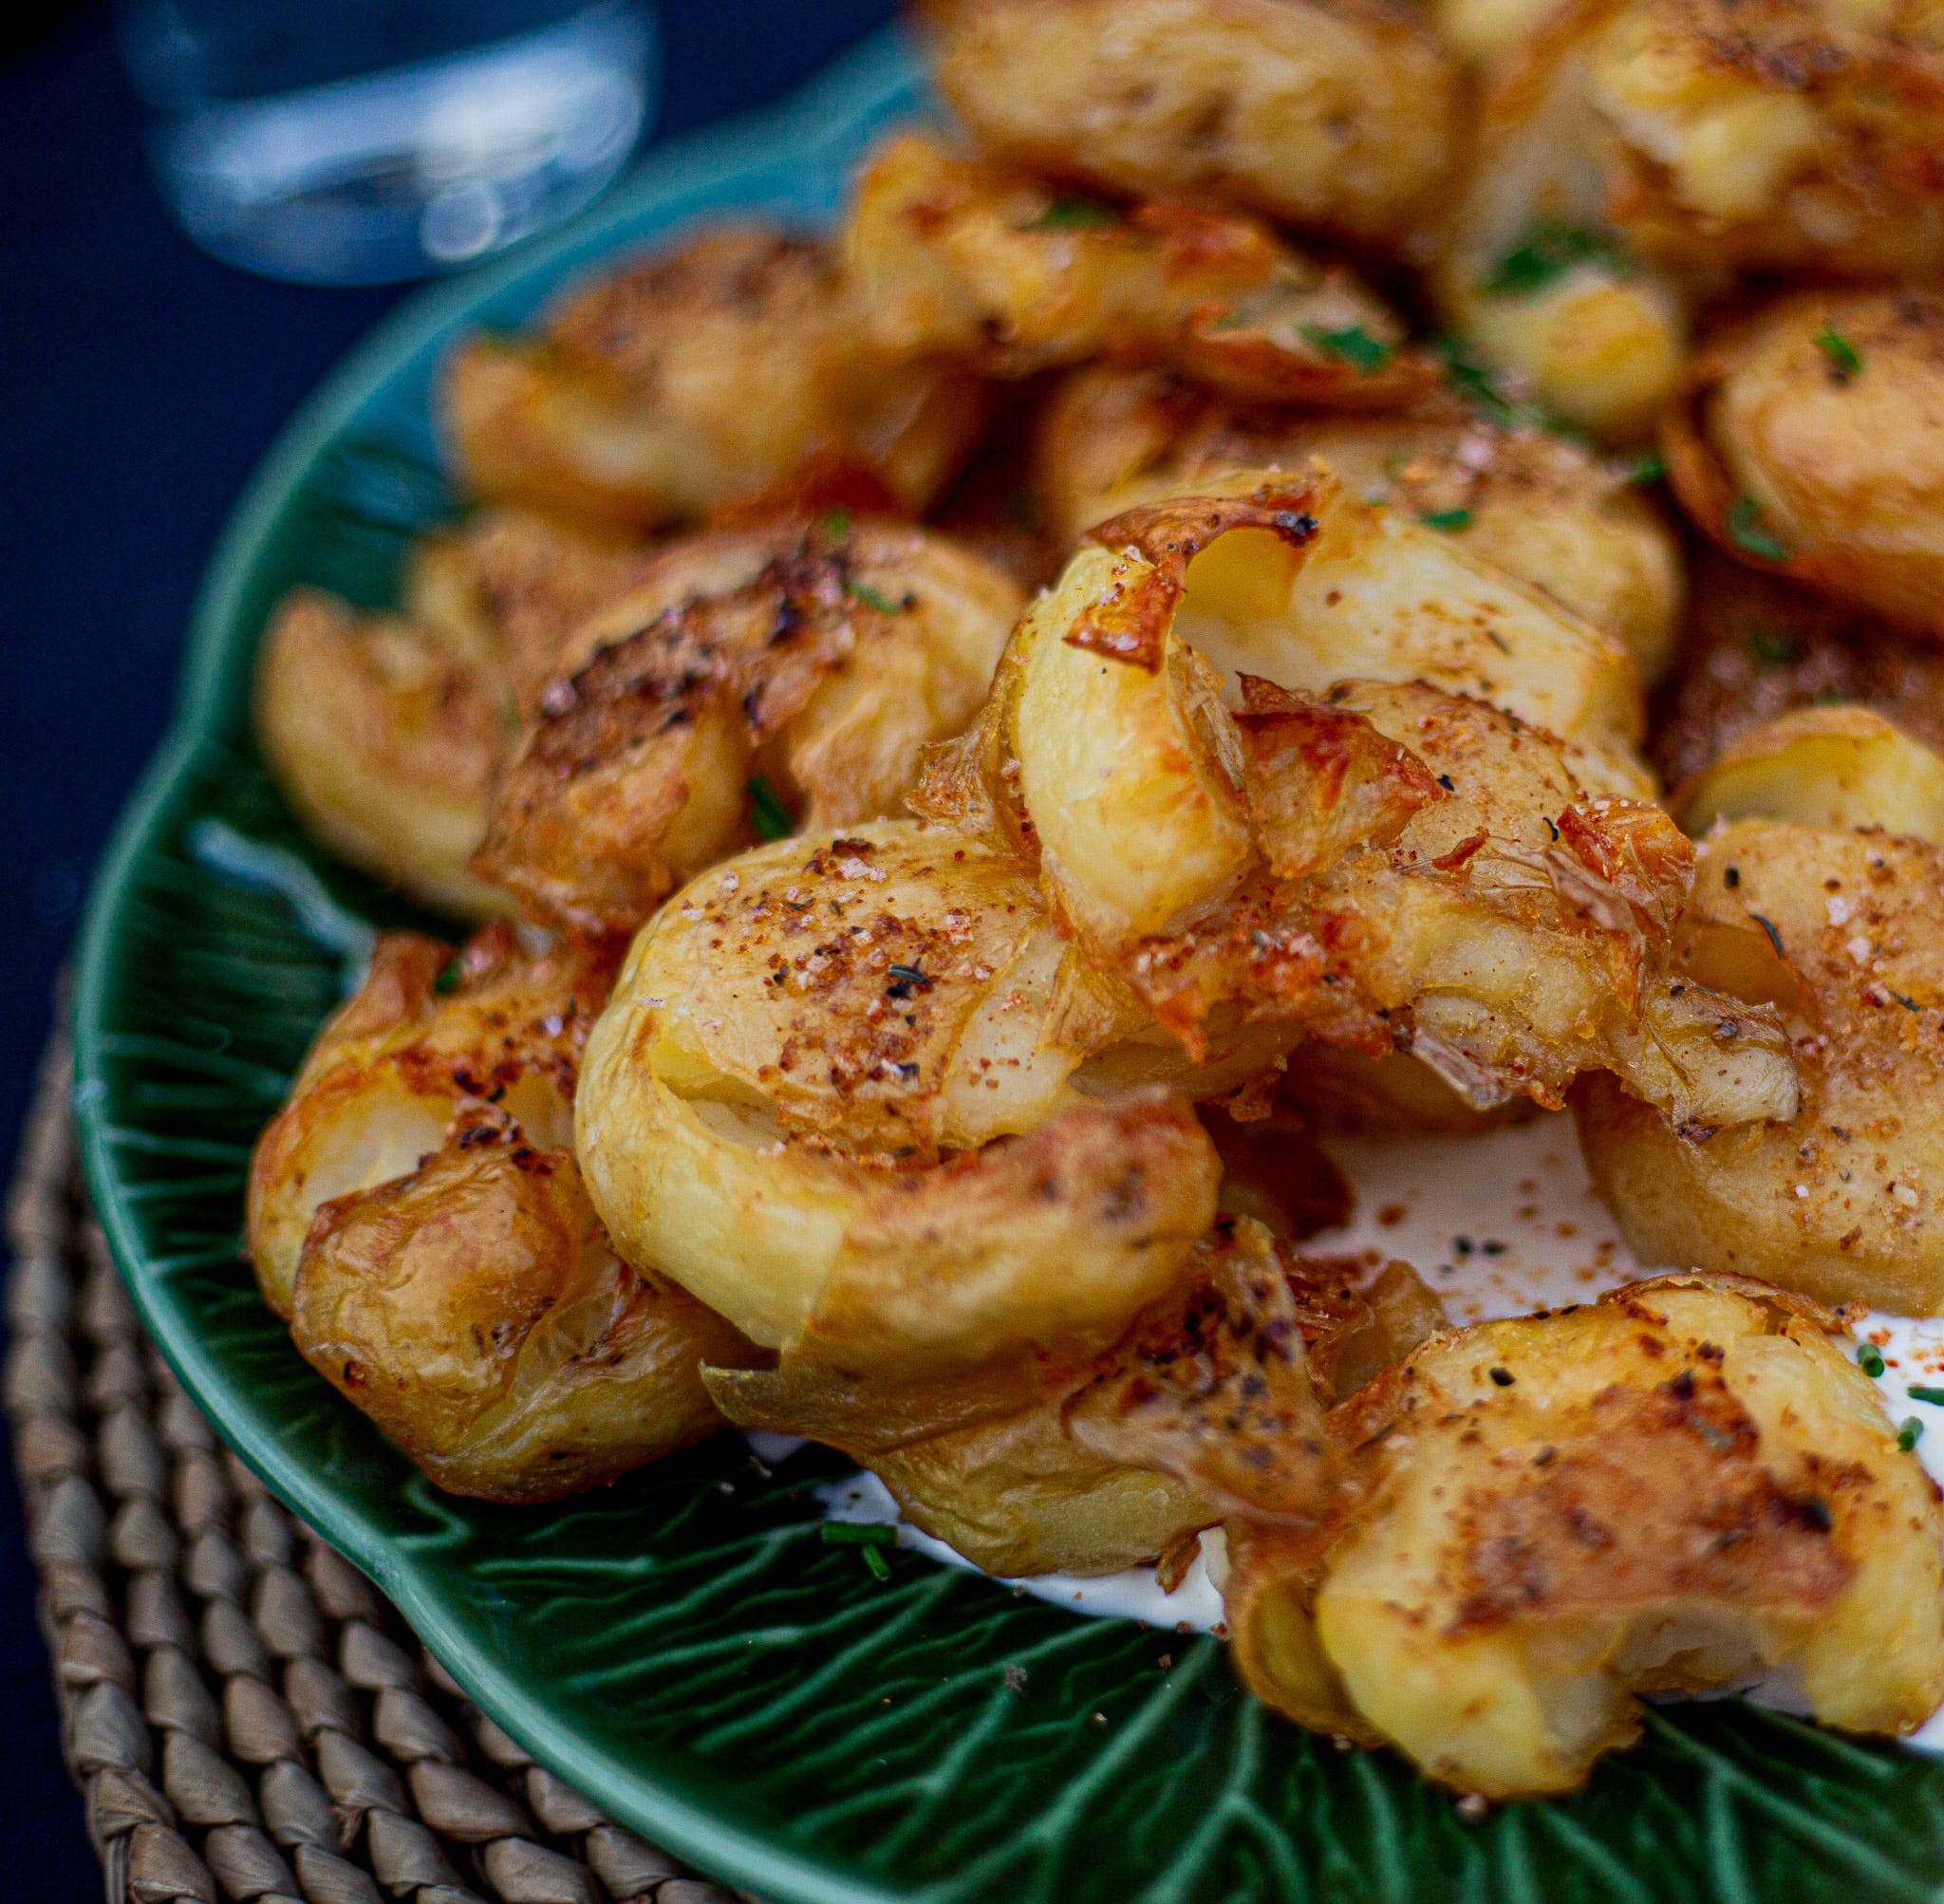
Ingredients
1.5 of small-to-medium potatoes
Rock salt
1 jar of duck fat, warmed for easy drizzling
Instructions
Clean the potatoes, removing any dirt or sprouting areas. Place them in a large Dutch oven or soup pot.
Fill the pot with water until the potatoes are covered by 1 inch of additional water. Bring to a boil over medium-high heat and cook until the potatoes are easily pierced by a fork (around 20 minutes for smaller potatoes and 25 minutes for medium-sized ones).
Drain the potatoes in a colander and let them cool for about 5 minutes.
Place the potatoes on a lined baking sheet and gently smash each one to a height of about ½ inch using a potato masher or serving fork.
Drizzle the warm duck fat (about 1 tsp per potato) over the smashed potatoes and sprinkle each one with rock salt.
Bake until the potatoes are golden on the edges (25 to 30 minutes). Serve immediately.
Hints & tips
No duck fat - Olive oil can be used as a substitute for duck fat. They won’t get as crispy texture but will still be delicious.
Serving size - The recipe can be doubled for larger servings and leftovers will reheat well.
Prepare in Advance - Boil the potatoes as instructed and cool them in the fridge until you're ready to bake. Smashing them while cold is a bit easier too.
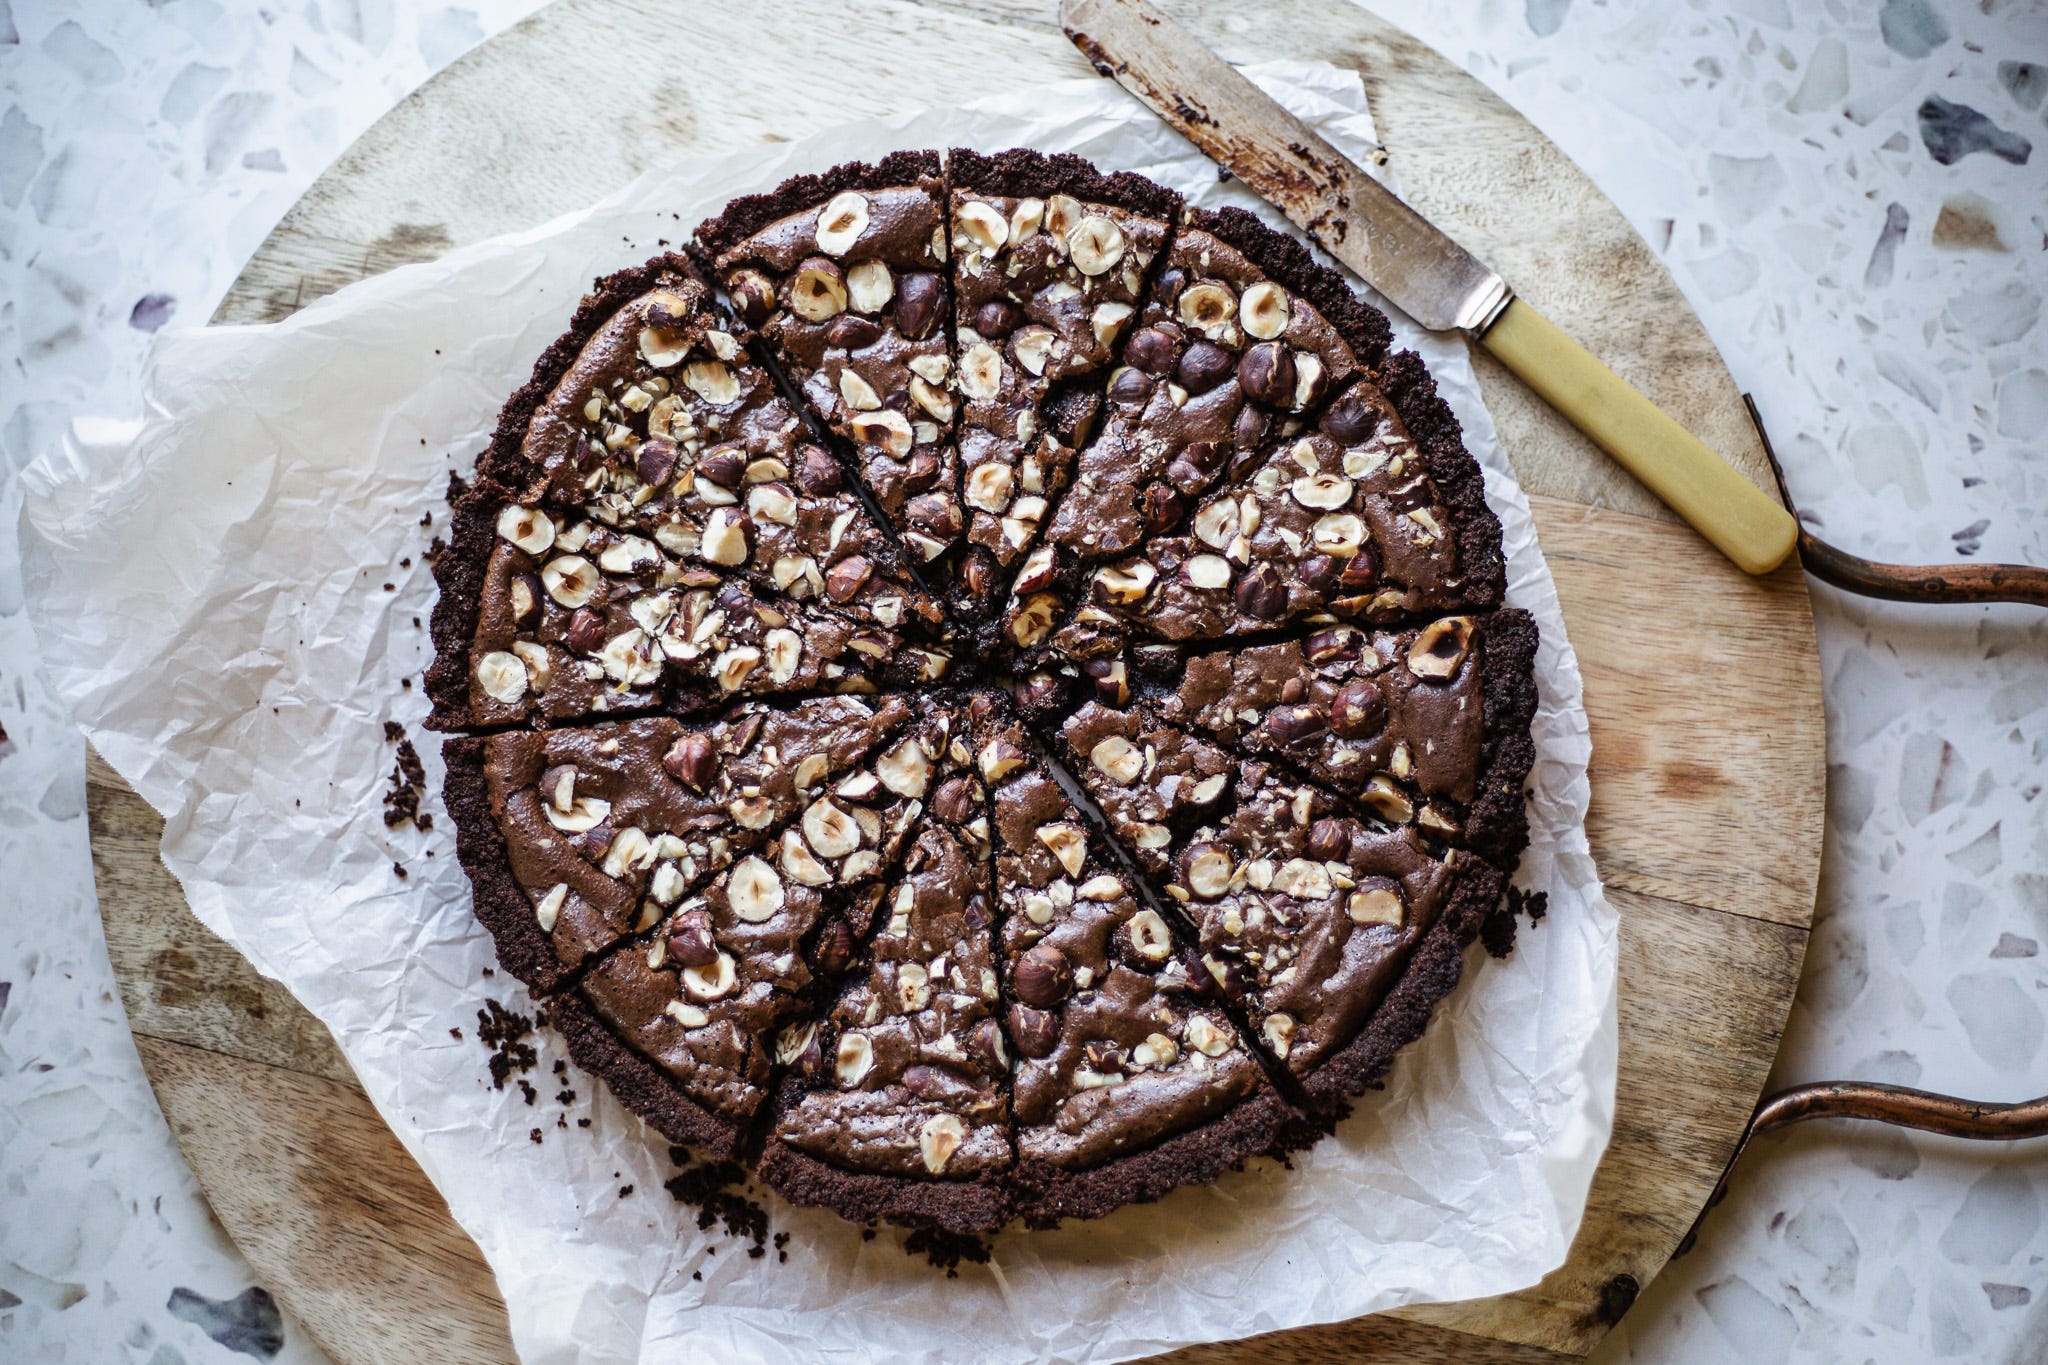
Chocolate Hazelnut Tart
This luscious chocolate and hazelnut tart features a chocolate biscuit base, a gooey brownie-style filling, and a topping of crunchy hazelnuts.
Serves: 8-10 || Effort: Moderate || Prep Time: 30 mins || Cook Time: 30 mins
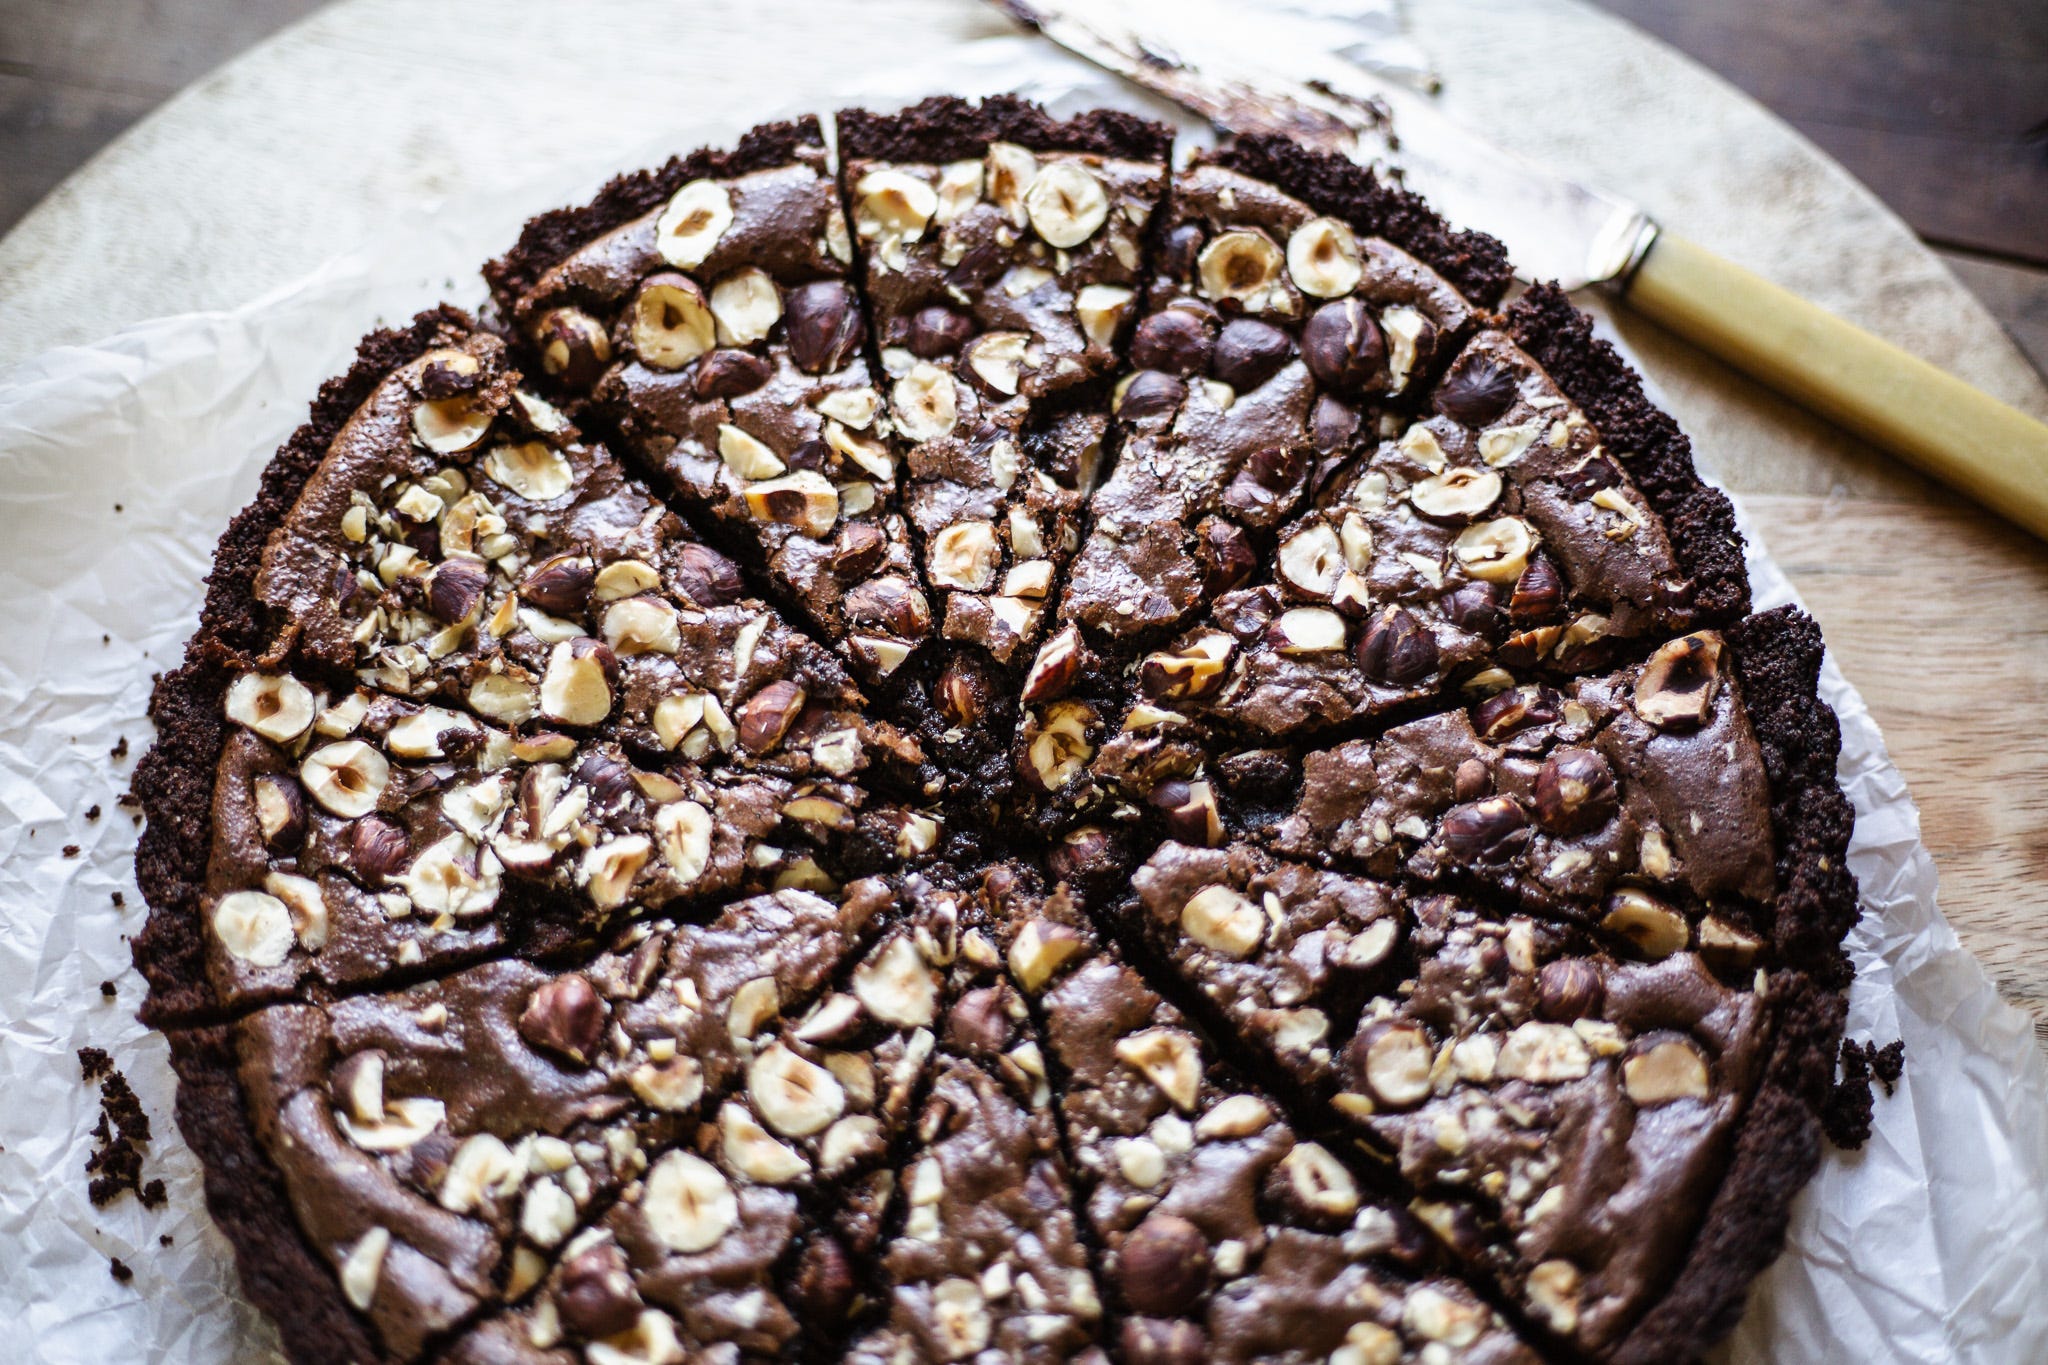
Ingredients
Base
1 packet of chocolate ripple biscuits
70g of melted butter
Filling
100g of dark chocolate
50g of butter
3 tbsp of golden syrup
3 eggs at room temperature
150g of brown sugar
1 tsp of vanilla
60g of chopped hazelnuts
Instructions
Blitz the chocolate ripple biscuits with 70g of melted butter. Press the mixture into a springform pie dish to form a chocolate biscuit crust. Refrigerate until needed.
Preheat the oven to 180°C/160°C fan.
Place the chocolate, butter, and golden syrup in a heatproof bowl over a saucepan of simmering water, ensuring the bottom of the bowl doesn’t touch the water. Allow to melt and stir until smooth. Leave to cool slightly.
While the chocolate mixture is melting, whisk together the eggs, brown sugar, and vanilla until well combined.
Once the chocolate mixture has cooled slightly, gradually beat it into the egg mixture until smooth. Ensure the mixture isn’t too hot, or it will scramble the eggs.
Remove the chocolate base from the fridge and pour the chocolate batter into the tart case.
Sprinkle over the chopped hazelnuts and place in the oven.
Bake for 25 minutes. The chocolate filling will have risen and be firm with a slight wobble in the center.
Leave to cool. Serve warm or cold.
"You don't have to cook fancy or complicated masterpieces—just good food from fresh ingredients." Julia Childs
A very big thank you to Sal for this special pre-Mother’s Day collab.
The Homestead Pantry Box is a no-brainer. A bi-monthly subscription designed for busy rural families with a carefully curated collection of spices, sauces and condiments bringing gourmet to your everyday.
For subscribers, Sal’s weekly newsletter is full of seasonal tips and tricks as well as her 3:2:2 method meal plan.
Do yourself a favour follow The Homestead Pantry Box on socials and shop the Pantry Shop today.